Inverting an image on an iPhone can be a useful tool for various purposes. Whether you want to create a unique visual effect or adjust the color scheme to improve visibility, knowing how to invert an image on your iPhone can come in handy. In this article, we will guide you through the process of inverting an image on your iPhone and provide you with some additional tips and tricks.
Many iPhone users often face challenges when it comes to adjusting the appearance of an image. Whether you want to enhance the contrast or make certain elements stand out, manually editing the image can be time-consuming. However, with the ability to invert an image on your iPhone, you can quickly achieve the desired effect and enhance your overall experience.
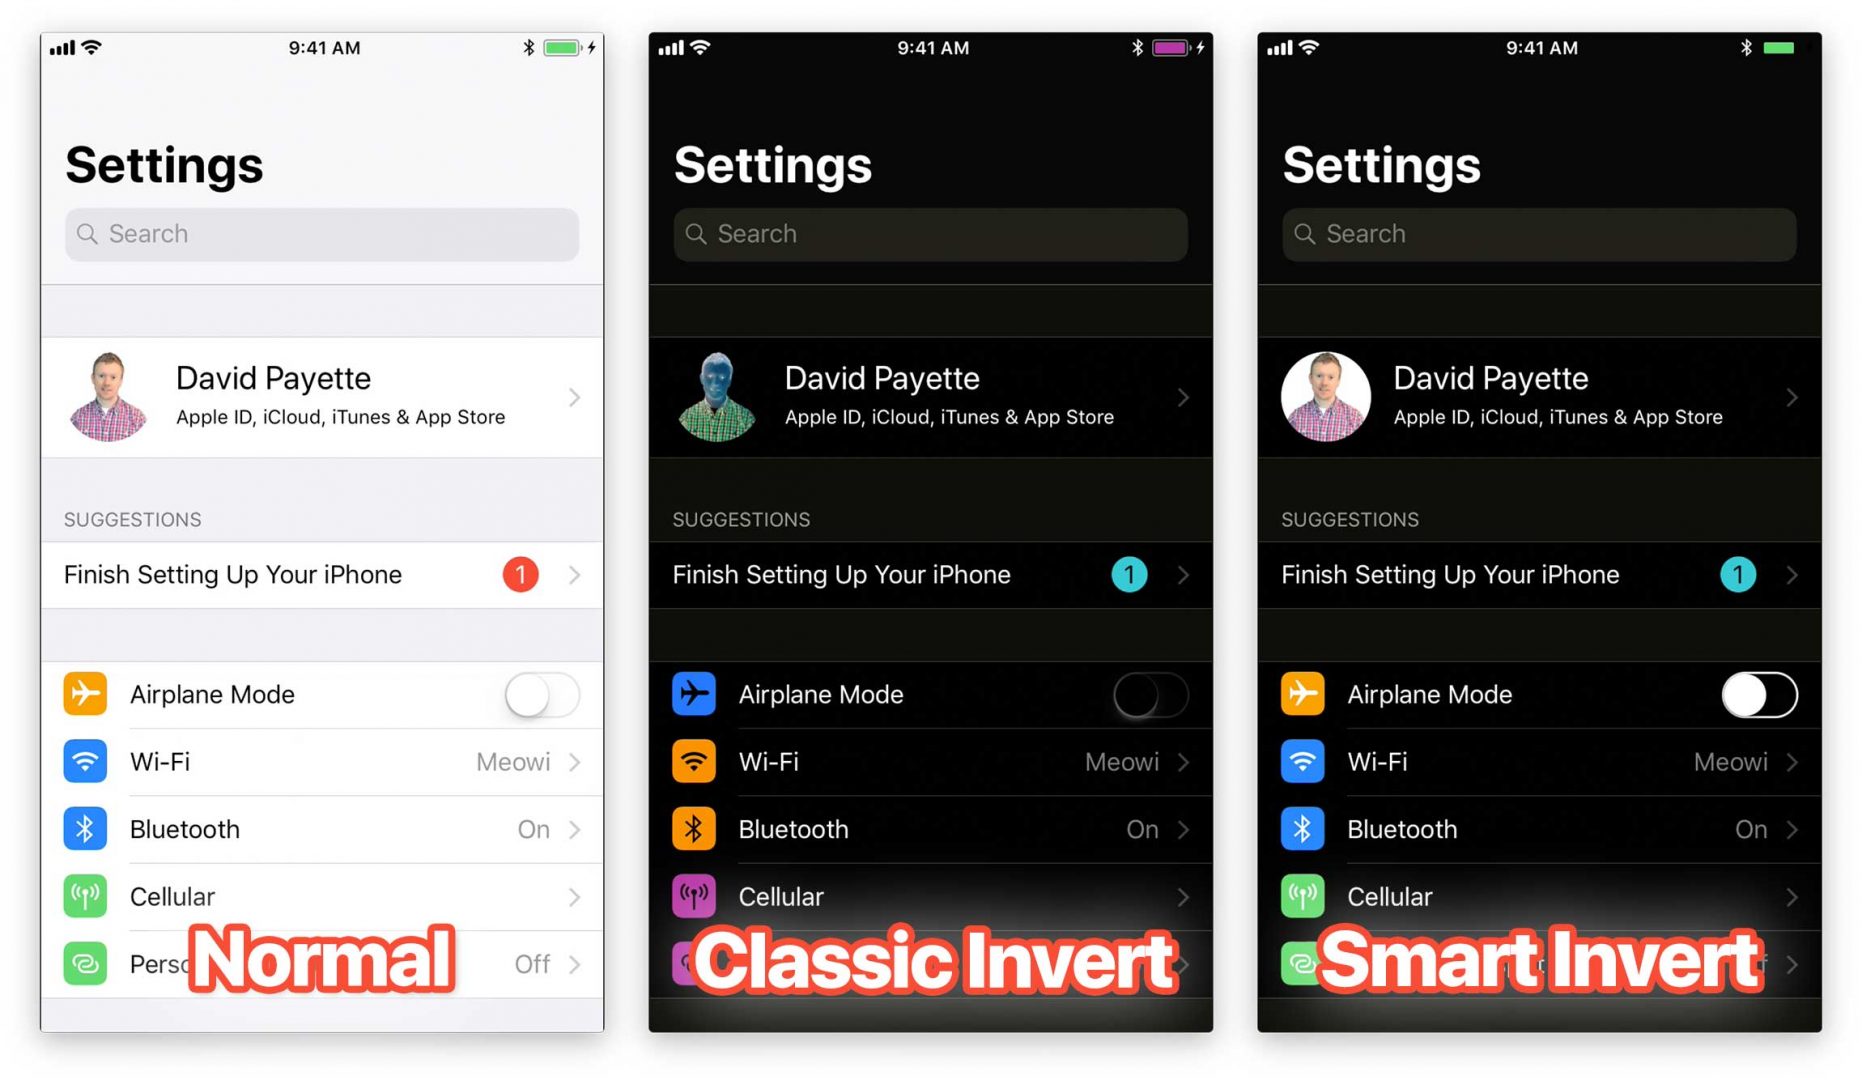
To invert an image on your iPhone, follow these simple steps:
- Open the Photos app on your iPhone.
- Select the image you want to invert.
- Tap the "Edit" button.
- Select the "Crop and Rotate" icon.
- Tap on the "Flip" option.
- Choose the "Invert" option.
- Save the changes by tapping "Done".
By following these steps, you can easily invert any image on your iPhone and achieve the desired visual effect. Additionally, you can experiment with different editing options in the Photos app to further enhance the overall appearance of the image.
Personal Experience with Inverting Images on iPhone
As an avid iPhone user, I have found the ability to invert images incredibly useful. Recently, I was working on a photography project where I wanted to create a striking contrast between the subject and the background. By inverting the image on my iPhone, I was able to achieve a visually captivating result that added depth and intrigue to my photograph.
Inverting images on your iPhone can go beyond simple editing. It can also be a tool for creative expression and experimentation. Whether you are a professional photographer or a casual user, knowing how to invert images can open up a whole new range of possibilities for your visual creations.
History and Myth of Inverting Images on iPhone
The concept of inverting images has a long history, dating back to the early days of photography. In the past, photographers would manually invert the negatives to achieve the desired effect in the final print. With the advancement of technology, this process has become much simpler and more accessible through digital editing tools like the ones available on the iPhone.
There is also a myth surrounding the inversion of images on the iPhone. Some believe that inverting an image can reveal hidden messages or images that are not immediately visible to the naked eye. While there is no scientific evidence to support these claims, it can add an element of excitement and mystery to the process of inverting images on your iPhone.
Hidden Secrets of Inverting Images on iPhone
Although the process of inverting an image on your iPhone is relatively straightforward, there are some hidden secrets that can enhance your experience. One such secret is the ability to adjust the intensity of the inversion. By using the editing tools in the Photos app, you can fine-tune the inverted image to match your desired aesthetic.
Additionally, you can explore different filters and effects available on your iPhone to further enhance the impact of the inverted image. Experimenting with these hidden features can unlock a whole new level of creativity and allow you to create truly unique and captivating visual content.
Recommendations for Inverting Images on iPhone
If you're new to inverting images on your iPhone, here are some recommendations to help you get started:
- Start with simple images: Begin by inverting simple images to familiarize yourself with the process and the impact it has on the overall appearance. This will allow you to gradually explore more complex images as you gain confidence.
- Experiment with different editing tools: Don't be afraid to explore the various editing tools available in the Photos app. This will enable you to customize the inverted image according to your preferences and achieve the desired visual effect.
- Share your creations: Once you have successfully inverted an image on your iPhone, don't hesitate to share your creations with others. Whether it's on social media or with your friends and family, receiving feedback and appreciation can further motivate and inspire you.
Diving Deeper into the Topic of Inverting Images on iPhone
Inverting images on your iPhone goes beyond just a simple editing technique. Understanding the science and psychology behind color inversion can provide a deeper insight into its potential benefits and applications. By further exploring this topic, you can unlock a whole new realm of creativity and visual expression.
Tips for Inverting Images on iPhone
Here are some additional tips to help you make the most out of inverting images on your iPhone:
- Backup your original image: Before making any edits, it's always a good idea to create a backup of the original image. This will ensure that you can revert back to the original version if needed.
- Try different inversion effects: Don't limit yourself to the standard inversion effect. Experiment with different filters and effects to create unique and visually stunning results.
- Consider the purpose: When inverting an image, consider the purpose and the message you want to convey. The inversion should enhance the overall aesthetic and communicate your desired visual narrative.
Conclusion of Inverting Images on iPhone
Inverting images on your iPhone can be a powerful tool for enhancing your visual creations and expressing your creativity. By following the simple steps outlined in this article and experimenting with different editing options, you can transform ordinary images into stunning works of art. Unlock the potential of inverting images on your iPhone and take your visual storytelling to the next level!